For this game, Mike and I both built separate 2500 point lists without knowing what scenario we would be playing or what other army the other player would be bringing. As I have been working on my rats on-and-off for the last several months, I wanted to break them out on the table. 2500 points is the largest game that I have played so far, and I really wanted to see what I could throw into the army. I was really looking at a Daemonspawn as I had not yet played with one and wanted to see what a flying character monster could really do in Kings of War and how it could add to the army. With that in mind, I came up with the following army list:
- Blight Horde (Fire Oil)
- Blight Horde
- Shock Troop Horde (Brew of Strength)
- Warrior Regiment (Diadem of Dragon-kind)
- Warrior Regiment (Crystal Pendant of Retribution)
- Clawshot Troop x2
- Weapon Team (Storm of Lead) x3
- Death Engine (Vile Sorcery) x2
- Warlock (Fenulian Amulet)
- Warlock (Bane Chant, Amulet of Fire-Heart)
- Swarm Crier (Flying Hammer)
- Enforcer (Fleabag, Mace of Crushing)
- Daemonspawn (Wings, Medallion of Life)
This list was similar to what I took to the West Coast GT, but dropped a few smaller units to move around Magic Items and add the Daemonspawn. The Blight Hordes were designed to take long range charges and then hit back to slowly win the war of attrition against my opponent. I don't expect them to do too much damage, but to hold for several turns allowing my force to counter-attack and break enemy units. The Shock Troop Horde is the big melee damage dealing unit. The small warrior regiments are simply there as roadblocks and the occasional objective taker. The rest of the list is there to deal long ranged damage and hopefully force several nerve tests on the enemy units throughout the course of the game. I hadn't played with a Daemonspawn yet, so I didn't really have any plans for the unit, except to slam into combat when needed and throw around the occasional lightning bolt.
For our game, Mike was Orcs. I had never played against Orcs before so I can't really say what the plan was behind Mike's list or whether he took optimal or fluffy unit choices. I also didn't clearly take down the magic items from his list so note that there are approximately 150 points in various magical items in this army. His list was:
For our game, Mike was Orcs. I had never played against Orcs before so I can't really say what the plan was behind Mike's list or whether he took optimal or fluffy unit choices. I also didn't clearly take down the magic items from his list so note that there are approximately 150 points in various magical items in this army. His list was:
- Gore Riders Regiment x3
- Ax Horde
- Ax Troop x2
- Skulks
- Morax Regiment x2
- Trolls Regiment
- War Drum
- Godspeaker (Gore) x2
- Flagger x3
- Krudger (Wings of Honeymaze)
- Greatax Regiment
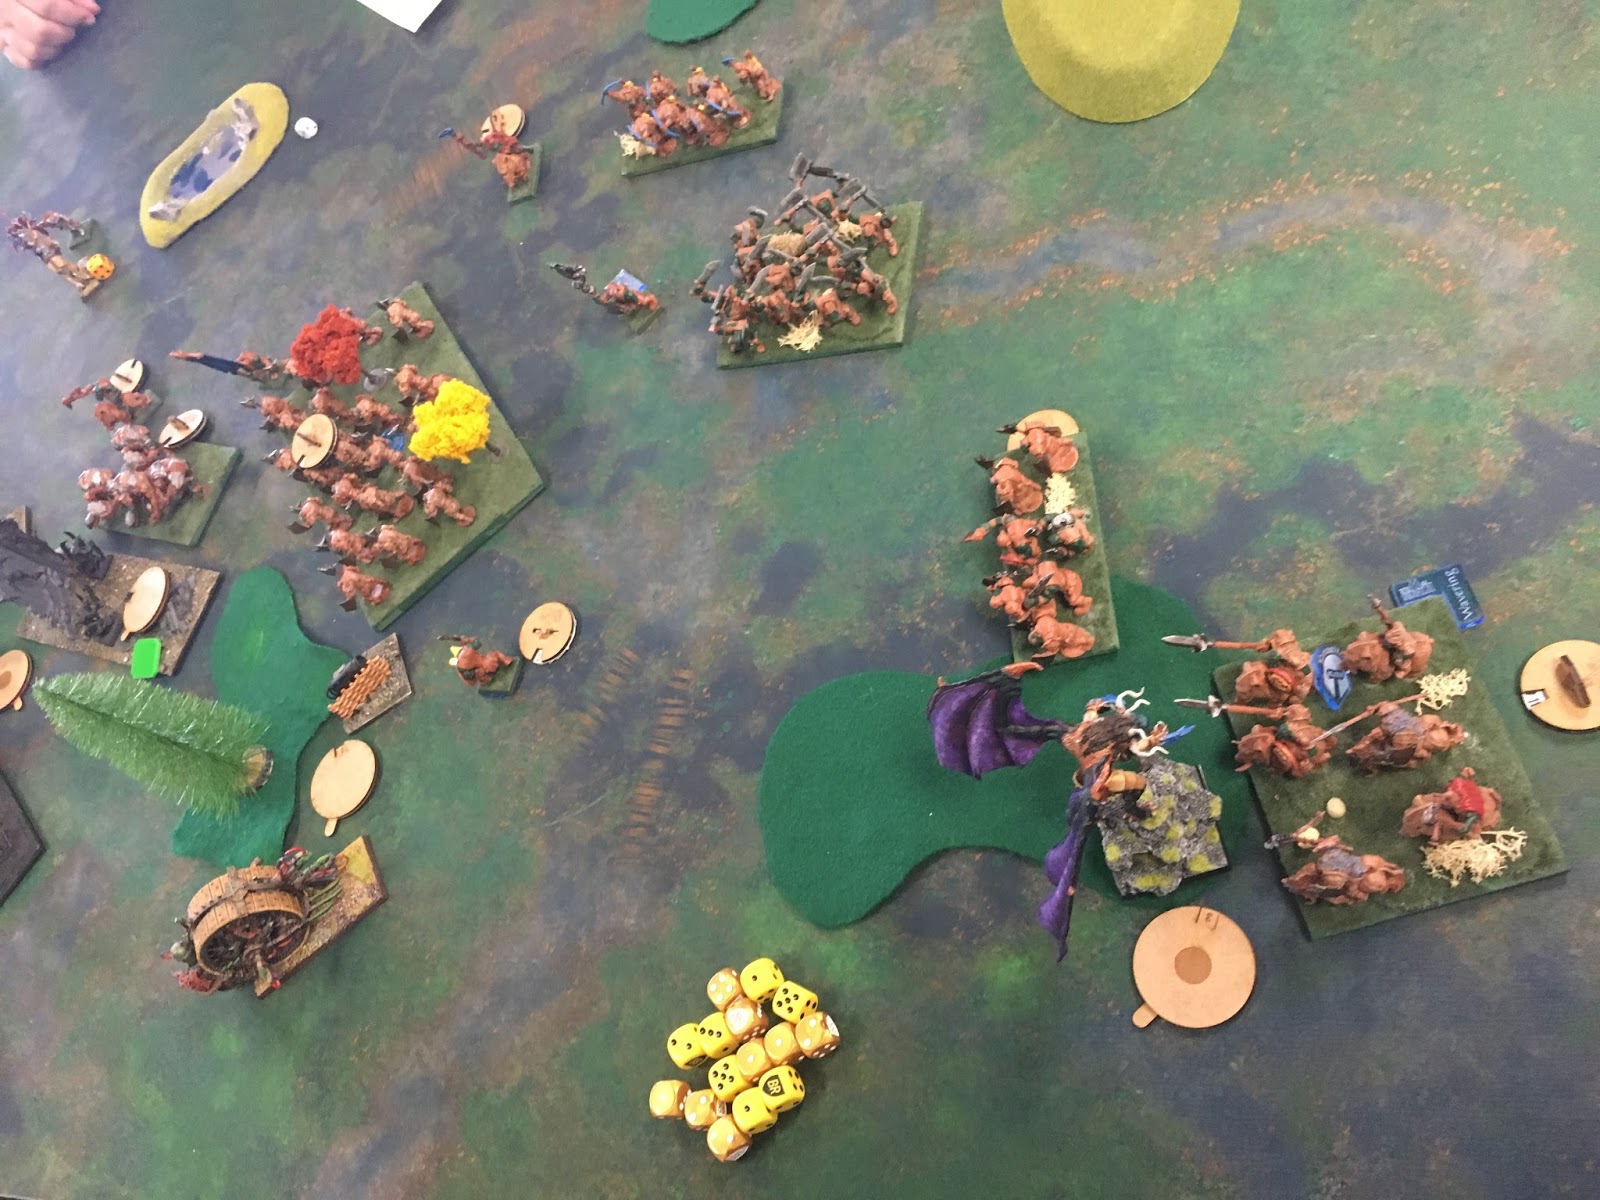
Deployment:
For this game, Mike and I rolled up Scenario 2: Invade! This would mean that both of our armies would be moving towards the center of the board and trying to make it into each other's deployment zone in order to score those all important victory points. The board was set up with a decent amount of terrain, and after deploying our armies, we were set to begin our battle.
 |
| Deployment! |
 |
| How the armies all lined up |
For my deployment, I took a semi-hard flank style to utilize the terrain and try and protect my fleshy and squishy flanks. My main battle line was the two Blight Horde units and the warrior unit with the diadem of dragon-kind. Behind that line was most of the weapon teams, the characters, the Storm Troop horde, the Deamonspawn, and both Death Engines. I had a very shaky right flank of the exploding warrior unit and a unit of Clawshot troops (which I really didn't protect well and deployed far too early).
Orcs Turn #1:
Mike won the roll off for the first turn which meant that he could really push forward and establish where the major battles would take place. Mike wanted combats to already begin on my half of the table. I wanted them to be on his half of the table. The turn dice decided that Mike would get to push into my deployment zone first and so I would have to work really hard to take out units and push through to his side of the board.

The orcs looked out over the battlefield and decided that a full out march was the best option. In fact, every unit in the army surged forward except for the Skulks in the trees who took some pot shot at the warrior unit on the right flank and caused a single wound.
Ratkin Turn #1:
The rats, seeing a racing tide of green rushing toward them pulled out their weapons and hoped to cause significant damage to the oncoming hordes before they reached the rat lines.

The rat battle line shifted up slightly and pivoted to face certain units, but made sure to stay outside the majority of orc charges. The long rat weapons took aim all across the board hoping to start spreading wounds around the army rather than concentrating on just one unit. My thought here was to inflict a little bit of damage across the board to give me a chance to roll higher nerve rolls and disrupt the orc lines a bit in the coming turns rather than just putting a single unit out of commission. The lone rat hero on giant rat was just within range to charge an Ax Troop and took the opportunity to block up several units. In combat, the rat caused three wounds and wavered the troop! Magic and shooting accounted for another dozen or so wounds across Mike' fastest or largest units (as I was playing for the long game now and hoping I could push through in subsequent turns).
Orcs Turn #2:
The orcs continued to press forward and try to close with the rat lines. The Gore Riders on the left flank charged the left-most Blight Horde but bounced off after only a single wound. On the right flank, one of the other Gore Riders charged the flank of the exposed Clawshot troop, destroying it outright. The rest of the orcs pressed forward. to try and collapse on the rats on Turn 3. The orc spellcasters chucked some fireballs at the other Blight horde and managed a few wounds, but the unit was unaffected.

Ratkin Turn #2:
The rats had weathered the orcs' initial charge on the left flank and were looking to capitalize on the overstretched cavalry unit. But on the right flank, the rats were slowly being pushed inward and would need to break out soon there was going to be a chance to get over the center of the board. Thankfully, a small hole had opened up on the orc battle line due to the wavered Ax troop, but the rats were unable to capitalize on it because of the Ax horde and Gore Rider unit effectively blocking the zone. The rat's best bet was to consolidate behind a wall of fire rather than over-extend themselves.

The Blight horde counter-charged the Gore Riders along with a flank charge by the Death Engine (who would be doubling its attacks). The weapon teams moved to target some of the larger units while getting out of the way of certain units (though I left open too many avenues to get the units isolated). On the right flank, the Deamonspawn and the warrior regiment charged the Gore Riders but both units were charging into the woods negating some of their combat effectiveness. Up top, the rat on giant rat charged the War Drum hoping to kill it before more orc units made it into combat. In combat, the Gore Rider on the left flank was decimated by the Blight horde and Death Engine. The lone rat character whiffed his attacks at the war drum and had to fall back. In the woods on the right flank, several wounds were caused, but a low Nerve roll failed to even waiver the orc cavalry. Luckily, the combined might of various lightning bolts, bullets, flaming shots and breath weapons caused severe damage on several orc units outright destroying the previously wounded Ax troop and the unengaged Gore Rider unit. A few more wounds were put on the ax horde and one of the orc shamans was seriously damaged, but stayed on the board due to another low Nerve roll (I was averaging a "4" on my Nerve rolls for this turn.)
 |
| The combat on the right flank. Poor Daemonspawn. He rolled a lot of "1"s and "2"s. |
In the last turn, two of the three Gore Rider regiments had been destroyed and wounds were piling up on the orc units. Would the greenskins be able to eliminate some of the Ratkin shooting and win the growing war of attrition?

Despite losing some of the faster and stronger hitting orc units in the last turn, the orcs were dominating the scenario at this point. The rats had only managed a single breakthrough unit while almost the entirety of the orc army was able to either charge or surge forward into my side of the table netting Mike a ton of victory points. On the left flank, Mike made a large push and surged every unit forward in order to close the distance with the Ratkin. The Ax horde charged forward into the center warrior unit, destroying the much smaller rat unit in a single round of combat! Next to the Ax horde, the characters moved up slowly to protect the flank while the flying Krudger charged and destroyed one of the weapon teams. Over on the right flank, the Gore Riders counter-charged into the warrior unit along with a flank attack from the Ax troop. The combined might of the two units was too much for the warriors even with the Deamonspawn nearby and the unit exploded in a blaze of glory causing several wounds to both orc units. Back in the orc deployment zone a flagger charged the rat on giant rat and managed to cause a single wound, but it was not enough to drive off the rat hero.
 |
| A look at the end of Orc Turn 3. |
Ratkin Turn #3:
The orcs had pressed into the rats, boxing them tightly in their own deployment zone. They would need to press big this turn and make so holes if the rats were going to be able to move forward.

 |
| The left flank of the rats after Turn 3. |
Orcs Turn #4:
The orcs had weathered another turn of Ratkin shooting and combat and began to press its advantage of locking the rats in their own deployment zone.

The orcs charged all up and down the rat line. On the left flank both the Greatax regiment and the Morax regiment slammed into the rat units destroying both the weapon team and the Death Engine (thanks to a very high Nerve roll of "11") in a single turn. In the center, the trolls regenerated a few wounds and then counter-charged the Blight horde but inflicted only minimal wounds thanks to the Blight's -1 to hit. The ax horde tried to charge but couldn't make it into the Blight unit's flank due to the positioning of the weapon team (though it looks like a clearer charge on the picture). However, the weapon team was destroyed by a charge of the flying Krudger who was working hard to make up its points. The right flank maneuvered around the Daemonspawn. In the back field, the orc shaman who survived thanks to the poor Nerve roll last turn fireballed the rat hero into a gooey mess.
Ratkin Turn #4:
The orcs had managed to clear out quite a bit of the rat chaff, and it was now time for the rats to counter attack and hopefully break through the orc lines.

On the left flank the Blight Horde charged into the Morax regiment wiping the orc unit of the board and opening a hole in the orc line. However, rather than push forward and risk getting charged in the rear, the blight horde turned to face the Goreax regiment. In the center, the wounded Blight horder counter-charged the trolls causing a bunch of new wounds, but another low Nerve roll kept the Trolls in the game. The warlocks threw some lightning bolts at the Orc shaman and flagger killing off the flagger but another roll of DOUBLE ONES kept the shaman alive to throw fireballs the next turn. The Death Engine turned to shoot at the flying Krudger but rolled poorly and one caused a single wound. Over on the far right flank the Daemonspawn charged the other Morax regiment and caused several wounds even with the terrain penalty, and it was just enough to see the orcs off in a single round. Finally, the remaining Clawshoot unit took aim at and killed the other shaman with a few lucky hits and an extremely high Nerve roll to make up for the other shaman.
 |
| The end of the rats Turn 4. |
Orcs Turn #5:
The orcs had lost several units in the last round, but there were still enough orc units to turn the tide of battle and they were all in the Ratkin deployment zone, giving Mike a ton of victory points.

The Goreax regiment charged the Blight horde that had turned to face at the end of the rat's turn. In the center, the Troll regiments charged the Blight horde in the front while the Ax horde charged them in the flank destroying the unit. The remaining orc units moved to continue to surroun the rats and prevent their escape.
Ratkin Turn #5:
Things were not going great for the rats. Even though the rats had managed to destroy a lot of orc units, they had been unable to break through the solid wall of orcs and race into the orc deployment zone. The rats would need to make a large move this turn in order to have a chance of scoring any points.

Over on the left flank, the Blight horde charged the Greatax unit, but was unable to kill off the regiment even with a successful Bane Chant. The lone rat hero charged the severely wounded orc shaman (who had more wounds than Nerve value at that point) hoping to do a single wound and send the shaman off the board. Thankfully, a single wound was caused and I managed to not roll doubles ones for the third turn in a row. In the center, the Storm Troop horde was finally able to move and get into combat (having blocked itself for several turns) and destroyed the ax horde in a great flurry of slicing rat blows. The Death Engine moved to shoot at the ax troop causing a few wounds, but the unit stayed around. The Krudger was finally killed by the Daemonspawn who moved out of the trees with a well placed lightning bolt. Unfortunately, there were still a ton of orc units left in the rat's deployment zone.
Orcs Turn #6:
The orcs had been battered and bloodied, but they held the battlefield. Mike used this turn to maneuver his units to maintain control of the field.

The Greatax regiment counter-charged the heavily wounded Blight horde that had been in combat for several turns and finally destroyed them. The trolls charged the storm troop horde and inflicted damage but the previously unwounded unit was still in peak shape. The ax troop charged the Death Engine to prevent it from shooting and caused a few wounds, but the engine was still alive.
Ratkin Turn #6:
There were more rats than there were orcs left on the board, but the orcs were all in the rats deployment zone. It became clear that the rats were not only going to need to wipe out all the orcs, but also have a Turn 7 in order to cross into the orcs' deployment zone.

The warlocks and clawshots took aim at the Greatax regiment and caused several wounds, but not enough to destroy the unit (I rolled only a middling Never roll). The Storm Troop unit charged the Trolls and finally destroyed the unit after regenerating almost ten wounds. The Death Engine counter charged the ax troop but another poor combat round and a poor Nerve roll saw the orcs survive. The Deamonspawn charged one of the flaggers in the hopes of overrunning into the skulk unit that had been slowly moving across the board. The flagger was easily killed, but the Daemon only rolled a "1" and failed to reach the Skulks (I needed a "4").
I then rolled to see if there would be a Seventh Turn. Unfortunately for the rats, I rolled a two and the game ended. Mike still had several hundred points in my deployment zone and I had none. The orcs had successfully invaded the rat's domain, even though it was a costly invasion. It was a great game, and one that might have had a different ending depending on how the roll for the first turn went. Mike winning the initiative roll allowed him to slam his units forward and gain the moment to place the battle line so far forward. I could have moved forward to match, but this would have reduced the damage I could have done and put my units into combat on turn 2 when the orcs were much stronger. It was a well fought game and though I boxed myself in, in a few spots, I was happy with how the hordes performed as both damage dealers and tar pits.
No comments:
Post a Comment